Snowplough Turns

Snowplough turns, as described by the name, are turns that are made with the skis in the snowplough position. The mechanics to this turn couldn't be much simpler, although as is often the case, most beginners don't quite find it so easy in practise.
As described in lateral weight distribution the ski with the most weight on it will have the most control over your movement. In the snowplough the skis are in a "V" shape with the right ski wanting to go left (direction of least resistance) and the left ski wanting to go right.
Initiating the Turn
To start a turn all that needs to be done is go from having your weight evenly distributed between the two skis, to putting more weight onto one ski than the other. This makes the ski with more weight on it have more control over your movement than the other ski, and turns your movement more into the direction that that ski wants to travel in (direction of least resistance) as well as letting the ski fall down the slope first (lateral weight distribution).
Although the right ski is on the right side, it is pointing towards the left, and if it falls down the slope first you will be facing left. The same with the left ski but the other way round. Therefore if you transfer more weight to the right ski you will turn left, and if you transfer more weight to the left ski you will turn right. This often catches a lot of people out, how you have to lean right to turn left, and lean left to turn right, but as you can see from the diagram, it's clear why this must be done.
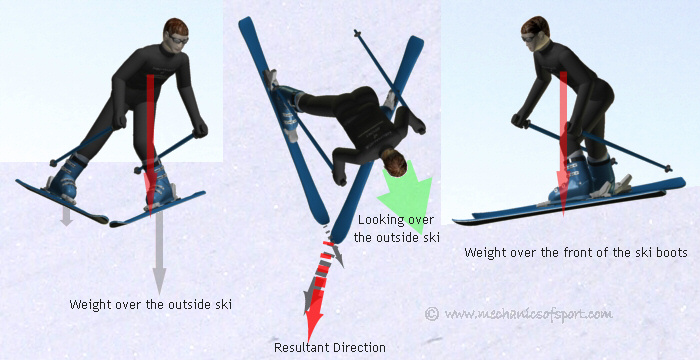
It is also important to remember to keep your weight in the middle of the skis lengthways (longitudinal weight distribution) to give you full control of the skis. While we make turns we should have our body facing across the outside ski slightly as well. This enables us to see down the slope better, and gives us a better stance.
The more weight we put over one ski than the other, the more effect that ski will have. Making you turn more quickly and turning you further across the slope. If all your weight is put over one ski, you should turn all the way until that ski is sideways to the slope, which should also bring you to a stop.
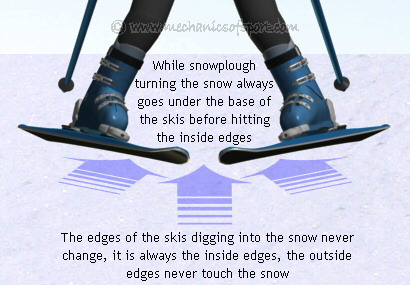
When we snowplough turn it is always the inside edges of the skis that push into the snow, with the outside edges never touching the snow. In more advanced manoeuvres the edges used on the skis have to be changed, but with the directions we travel in while snowplough turning there is no need. Having no edge changes needed makes snowplough turns much easier, as it is only your body weight that needs to be moved, while the rest of the position stays the same.
Walk Through Explanation
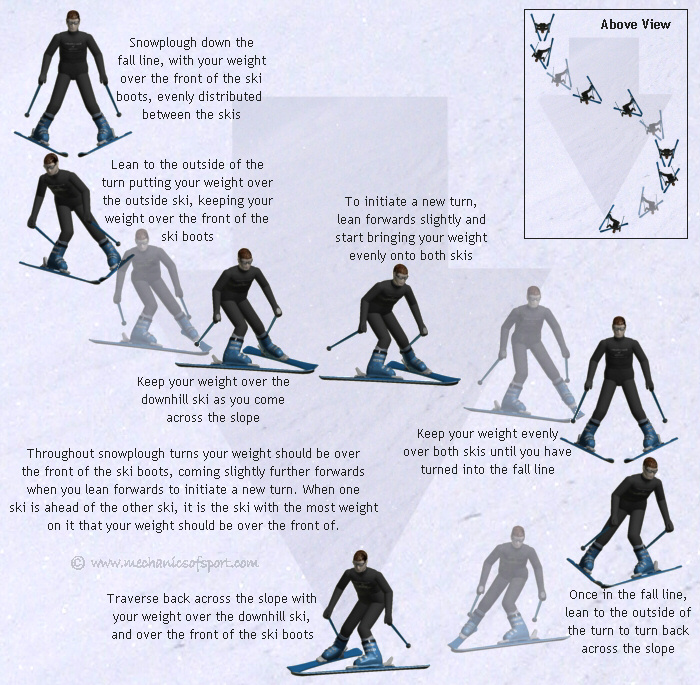
As that is the physics of making snowplough turns explained. Below is a walk through explanation of how to snowplough down a slope making turns, assuming that we are starting pointing straight down the slope, and that we will turn left for our first turn.
Starting with our weight evenly on both skis, we let ourselves start to slide forwards. Once a bit of speed has built up, we are going to turn left. To do this we lean to the right, bringing our body over the right ski, and putting more weight on the right ski. The harder we lean, the tighter the turn we make will be. Remember that you will turn in the opposite direction to which you have leant. Once we have turned left a bit and are starting to lose some speed, we can adjust the angle that we come across the slope with by taking a bit of weight off the right ski or putting more weight on the ski (although still keeping more weight on the right ski than left). Taking a bit of the weight off of the right ski will make you come into the fall line more, and pick up a bit of speed. Putting more weight on will bring you across the slope more, and slow you down. Then when we want to start the next turn, we bring our weight evenly back to both skis and lean forwards a bit. This makes us fall back into the fall line, so that we are going straight down the slope. As soon as we have got to pointing straight down the slope again, we lean to the left, putting more weight on the left ski. We then start to turn right, and as before when we start to lose a bit of speed we can adjust the angle that we come across the slope with by taking off or adding weight over the left ski. We then start all over again bringing our weight evenly back to both skis and leaning forwards slightly, to initiate the new turn. (Note that leaning forwards is only used to turn into the fall line, once in the fall line it is not needed and the weight should be in the middle of the ski)
When you want to stop all you need to do is put all your weight onto one ski so that you turn across the slope, and then keep leaning on the ski until you come all the way round to sideways, where you will lose all your speed and stop.
Snowplough Turns Animation
In the animation below, you can see the 3D skier making 4 turns. For the first 2 turns he is not leaning so far over the outside ski, and therefore not turning so much, or coming so far across the slope. For the second 2 turns he leans all the way over the outside ski, and turns all the way across the slope.
Common Mistakes:
- Leaning back - It is important to make sure you keep your weight in the middle of the skis lengthways or the front of the skis will not push into the snow properly and decrease the amount of control you have (longitudinal weight distribution). Leaning back can make the skis turn around, but it will not change the direction you slide in, so that you continue to slide straight down the slope, instead of coming across the slope. For the skis to move you sideways across the slope your weight needs to be further forward, with your shins pushing gently against your ski boots.
- Leaning onto the wrong ski - Before you start to move make sure you realise that you need to lean onto the ski on the outside of the turn. Most peoples natural instinct is to try and lean to the inside of the turn, so as soon as anything unexpected happens or they get a bit frightened they resort back to this, and you need to try and override that.
- Not leaning onto one ski enough - When you put more weight on one one ski than the other, you really do need to put more weight on one ski than the other. If you do not move your weight across enough, there will not be much effect from the weight transfer.
- Giving up too early - When you move you weight across to one ski, you will not change direction instantly, you need to have enough patience to keep your weight there until you start to turn.
- Moving the hips - The hips need to stay more or less in the middle of the skis, if you move your hips to one side or the other while you make your turns it can have 2 different effects. Firstly it changes the angle that the ski edges dig into the snow at, which can effect how much grip the each ski has during the turn, and secondly, moving the hips can cancel out or decrease the lean made by the upper body. This means that although the upper body is leant over you might find that because of the hips there is no extra weight on the outside ski, stopping the skis from turning around as they should do.
More general common mistakes can be found in the Common Mistakes page of the Learning to Ski section.
Tips:
- Until you are more confident with snowplough turns, it is always good to practise on a gentle slope with a large flat area at the bottom (or a slight uphill slope at the bottom). This means in the case that you lose control and shoot straight down the slope, you will naturally come to a halt at the bottom without needing to do anything. On a slope like this there should be nothing to worry about as you should always be able to stop safely.
- Taking ski lessons will introduce you to skiing exercises based on how people learn to ski in real life, so that you learn to snowplough turn with the correct technique.
On to the Getting Up section.