Using Resistance
We have already found out how to create resistance and about effects that resistance can have, in the last sections, now we need to learn how to use it to control yourself. Using resistance is the basis to all control in skiing, so it is good to know the basics of how it works.
Put simply there are a few things that you need to consider while you are skiing; gravity, momentum, resistance from your skis, friction between your skis and the slope, and wind resistance. We are generally going to ignore wind resistance and friction though, as although especially wind resistance can make a large difference to how fast you will go, we generally do not use them to control our motion, although we do consider some of their effects. Because we ski in a real life 3D environment, when we consider the direction of anything, we also have to take all 3 axis into account. Along each axis there is 3 things that you can do, you can speed up, slow down, or stay a constant speed. How to calculate forces and accelerations across the different axis was shown in the creating resistance section.
Walk Through Explanation
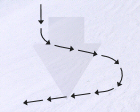
To show how resistance is used we are going to go through and example of how we use resistance to ski down a slope making a couple of turns and then stop. We are assuming that the slope is perfectly flat and has a constant gradient, so we are going to simplify things slightly by looking at things as if they only happen along 2 axis, down the slope and across the slope. With the resultant force from gravity acting down the slope.
Getting Started
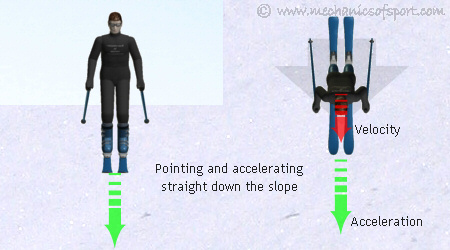
We are going to start with our skis pointing straight down the slope, so that we travel straight down the fall line, and are accelerating down the slope as we are not creating any resistance against gravity. We then want to start a turn, and create a sideways force that will push us across the slope. To create this force though we need to bring the skis so they are at an angle across the slope (as in resistance effects). Then the skis will have a component of their resistance acting across the slope, and can produce a force that makes us accelerate across the slope.
Initiating The Turn
How do we start to turn the skis though, when there are no sideways forces and we have no rotating momentum. One thing we should not do, is swing our body to try and move the skis. Although this can turn the skis, it always puts the body out of position so that it is hard to recover, and is a common mistake made by beginners. 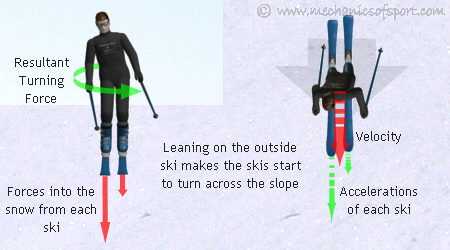 There are two ways to do this correctly, we can put more weight on one ski than the other, making the ski with the most weight on it fall ahead of the other ski, and the skis start to turn across the slope (lateral weight distribution). Or as we do with carving, we can lean the skis over so that the curved edges cut into the snow and steer us out of the fall line, this method is covered further at the bottom of the page, as we are going to use the lateral weight method here where the skis are always able to slide sideways and the edges are not dug in as much.
Turning
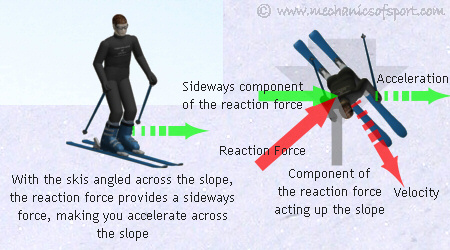
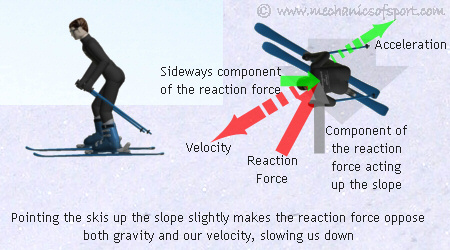
So by putting more weight on the outside ski, the skis start to turn sideways so that they are pointing across the slope at an angle. As shown in the resistance effects section, this creates an acceleration across the slope, and we will start to move sidways as we continue down the slope. When doing this, we also decide how much to tilt the skis onto the edges (as in edge pressure), if we still want to let ourselves carry on accelerating down the slope we don't tilt the skis so much, if we want to slow down in the direction of the slope, we tilt the skis more (as in edge effects). If we tilt the skis more, the larger resistance force we create also makes the sideways component of the reaction force larger and we will accelerate across the slope more. In the diagram the force up the slope is equal to the gravitational force down the slope, therefore all the resultant acceleration is sideways.
Traversing
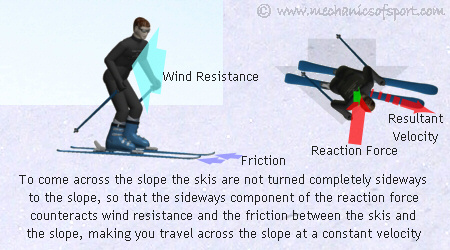
At the end a turn we generally ski across a slope with a constant velocity. To do this, we bring the skis more sideways to the slope, and angle them so that gravity is causing no accelerations or decelerations. Due to the effects of wind resistance and friction though we have to keep the skis pointing down the slope slightly do maintain a constant velocity.
Initiating The Next Turn
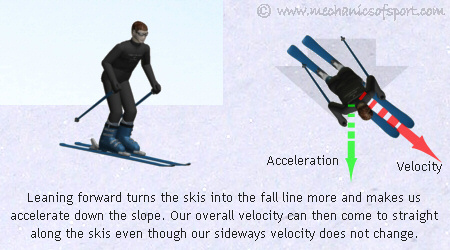
After skiing across the slope for a bit, we will want to make another turn, and to do this we need to create a sideways force across the slope in the other direction to the one we are traveling. By reducing our resistance to gravity we can let ourselves accelerate down the slope which will change our velocity down the slope, but we can't decrease our speed across the slope until we create a force pushing us across the slope in the other direction. To create this force we have to change the edges on our skis that are in the snow, as the edges we are on can not push in the direction we need unless we angle the skis up the slope. To change the ski edges though we need to be traveling straight along the skis (this is explained further here in parallel turns). To do this we lean forwards to make the front of the skis fall into the fall line more, letting ourselves accelerate down the slope until the skis are pointing in the direction we are traveling.

As soon as we are traveling along the skis we change the edges on the skis so that the other edges are in the snow. Notice that you will still be going across the slope when you have to change the edges on the skis, as your velocity across the slope will not change until you have changed the edges. Then as with turning across the slope in the first turn, by leaning on the outside ski we can bring the skis so they point at an angle to our velocity, and tilt the skis so that the edges create a sideways force across the slope. This creates an acceleration back across the slope, and decreases our speed across the slope.
Finishing The Turn
Keeping more weight on the outside ski will continue to turn the skis so that they start pointing across the slope and can counteract gravity as well, as with the first turn. From this position we can keep our weight over the outside ski again, and keep turning the skis across the slope until we get to the angle that we want to traverse across the slope at.
As before at the end of the turn we come to steady velocity, and put the skis at a flatter angle so that wind resistance and friction cancel out any accelerations that are created. As with the first traverse but in the other direction.
Stopping
We now want to stop. To do this we need to oppose gravity and our velocity, but they are not acting in the same direction. Stopping is also a dynamic manoeuvre in that your position constantly changes, as when you start to slow down gravity will still remain the same, but your velocity will decrease so that it doesn't need to be reacted against so much. To start stopping, we turn the skis up the slope a bit by leaning slightly backwards, then the reaction force will oppose both our velocity and gravity.
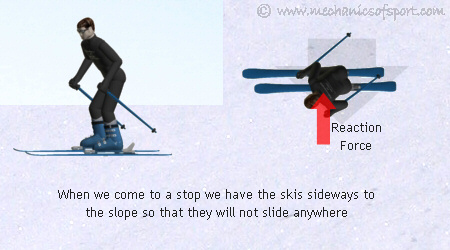 As we lose speed we don't need to counteract our momentum so much. We let the skis flatten off as we slow down by leaning forwards, until we come to a halt with the skis completely sideways. We then keep the skis sideways when we stop so that their resistance opposes gravity and we will not slide anywhere.
Using Resistance with Carving
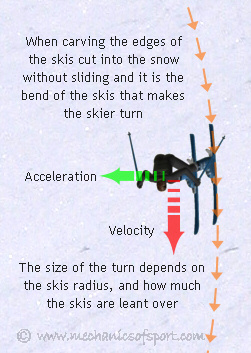
When we carve, we use our resistance in a slightly different way as we are using the shape of the skis to change our direction, and are not sliding the skis around. Although it is not shown in most of the diagrams, when we lean our skis onto the edges, the skis bend so that the edge sits along a curved track into the snow. It is this curve that carving uses to turn, and control the direction you are going in. When carving, normally we are always turning, we basically push the edges on one side of the skis into the snow so that they turn us one way, and once we have turned enough in that direction, we change the edges on the skis, so that the other edges dig in and make us turn in the other direction and then keep repeating this. Carving is the most energy efficient way to ski as the skis always move forwards along their length, which gives them the least possible resistance (direction of least resistance), and because of this, it is the technique that ski racers use. With carving as it is the edges that give us all the control over our direction, the weight shifts do not work in quite the same way either, as we do not use them in the same way to make us change direction. This is all explained further in the carving section.
When racers ski they want to go as fast as possible and do not want to use any resistance in the direction of the slope as that would slow them down. They only want to create resistance sideways so that they can go across the slope and through the gates. Because of this they use techniques so that they always push sideways as much as possible, by shifting their weight along the ski as they turn, always keeping the weight on the part of the ski that is most sideways to the slope.
On to the Weight Shifts section.